 boot13
Microsoft continues to miss the mark in its efforts to fix the Windows Start menu. Introduced in Windows 95, the Start menu became yet another Windows garbage can (like the registry), filled with items that you had to scroll through to find what you were looking for. Many users gave up on it and continued to use their desktop for commonly-used shortcuts.
I chose a different approach, which was to customize the root folder of the Start menu, so that while the ‘Programs’ subfolder was still filled with garbage, and I rarely even opened it, the top of the Start menu contained only the shortcuts I really used. This had the advantage of keeping my desktop clear while making the Start menu easy to navigate.
Microsoft tried to clean up the Start menu in subsequent Windows releases, adding highlights for newly-installed shortcuts, fading out rarely-used shortcuts, adding a quick keyboard search, and widening the menu to two columns. None of these changes really gave me what I wanted, though, and I continued to customize the Start menu as before.
Starting with Windows 7, it was no longer possible to customize the Start menu by simply adding and removing shortcuts and folders to its top level folder. At that point I started looking into alternatives, and settled on the method described below.
Later, with Windows 8, Microsoft gave up on the Start menu completely, pushing users to the even less usable Start screen. This was a very bad idea, and users (including myself) complained bitterly. Microsoft promised to bring the Start menu back in Windows 8.1, but then reneged on their promise, choosing to wait for Windows 10 instead.
Which brings us to Windows 10. But while the Start menu is back, you still can’t really customize it. There are ways of doing it, but they are nowhere near as convenient as in the past. Many users are buying third party software to bring a usable Start menu to Windows 10.
The procedure
I’ve been using this this method to create a custom menu on the taskbar since Windows 7. Before Windows 7, it was still possible to easily customize the Start menu, so this wasn’t really necessary.
- Right-click the taskbar and uncheck Lock the taskbar if it has a checkmark next to it.
- Right-click the taskbar again, select Toolbars, then New toolbar…
- In the New Toolbar – Choose a folder dialog, navigate to your documents folder.
- In the right hand panel, right-click in an open area and select New > Folder from the context menu.
- Enter a name for the new folder. I use ‘[Menu]’ because I have a weird affinity for square brackets. Press Enter to finish creating the folder.
- Make sure that the folder you just created is selected: its name should appear in the Folder box below.
- Click the Select Folder button.
- The new toolbar should appear somewhere on your taskbar. Exactly where it appears will vary.
- Drag the new toolbar to where you want it to appear. I like mine on the far left, just to the right of any pinned app icons. To do this, you have to click and hold the mouse on the name of the toolbar, then drag it. You can drag it past and over other toolbars. This might results in a bit of a mess, but we’ll fix that shortly.
- You probably want the new toolbar to take up as little space as possible on the taskbar, so make it shorter by clicking and holding on the two narrow, vertical lines at the extreme right end of the new toolbar, and dragging to the left.
- At this point it will be helpful to drag a shortcut to the new toolbar, to help give you an idea of what you’re dealing with. If you right-click and drag a shortcut, when you release the mouse button, you’ll get a context menu that will allow you to choose whether you want to move or copy that shortcut.
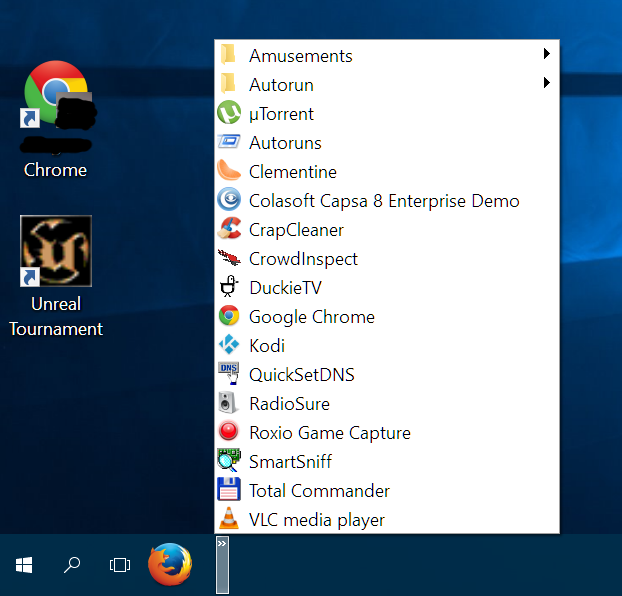
- If the toolbar is narrow enough, the shortcut will disappear and you’ll see a small double-arrow icon appear. Click this small icon to see what your new custom menu looks like.
- Right-click on the new toolbar’s name, and uncheck Show Text.
- Right-click on the new toolbar’s name, and uncheck Show Title.
- At this point you’ll notice that with the toolbar title gone, it’s more difficult to know where to right-click on the toolbar to see its context menu. I find that right-clicking on the two vertical lines on the far left of the toolbar does the trick.
- Right-click on the new toolbar, select the View menu, then choose Large Icons or Small Icons, according to your preference. I like small icons.
- Carry on adding more shortcuts to the new toolbar. You can add any kind of shortcut: applications, documents, and web addresses. You can also right-click on the toolbar and select Open Folder to make this task a bit easier.
- Make a final adjustment to the width of the toolbar by dragging the double lines at its right end. I like to make it wide enough to show the top couple of shortcuts right on the taskbar, which I use for my browser and email applications.
- Adjust the widths of any other toolbars that got messed up earlier.
- Right-click anywhere on the taskbar and select Lock the taskbar.
- The new menu may occasionally be a bit slow to respond, but you’ll find that with frequent use this behaviour improves.
One thought on “Setting up a custom taskbar menu in Windows”